
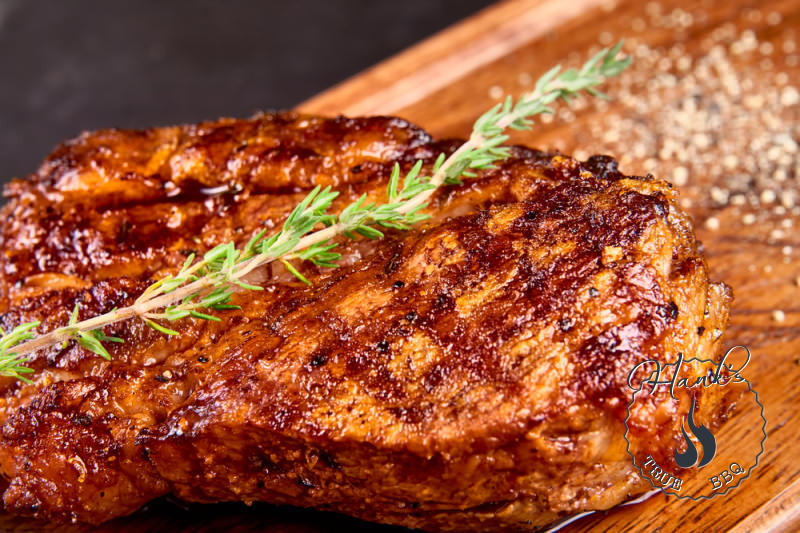
Searing meat
Frying or searing a steak is seen as an obvious skill by many, and often attempted (in my opinion) without actually knowing how it really works, and what the key steps are. I have preferred the oven for a long time myself, as I think it is easier to succeed with until you master the frying.
I think that searing a steak requires both skill and practice, and quite frankly takes a bit of time to learn.
On the other hand, It isn’t rocket science either. Let’s go through the details, step by step.
First off though: why do we sear? Well, it definitely has a visual appeal, but even more important is the flavor that you get from searing meat, whether it is red meat, poultry or fish. Thanks to the Maillard reaction the surface becomes caramelized and lightly burnt, and this tastes good.
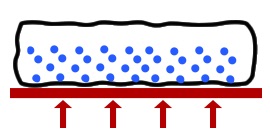
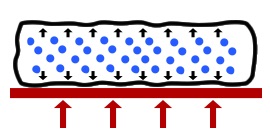
Most people have been taught to take the meat out of the fridge at least 30 minutes before cooking it. This is to allow the meat to reach room temperature. Why is that? Well, you want to avoid having too large of a temperature difference between the frying pan and the meat. It is kind of like when you jump into ice cold water; your whole body tightens up to “handle” the temperature chock. It is the same with meat, it will contract very quickly if you put it in the frying pan when it’s cold, which forces fluid out of the steak. The more juice in the steak, the better the end result is on the plate.
Dry surface!
The next step is to pat the meat dry with (non-fuzz) paper cloth. The reason for this is to remove all fluid, as it will inhibit the previously mentioned Maillard reaction that creates the nice brown surface. So; if the surface of the meat is either moist or wet, make sure you pat it dry.
Both tips are valid for regular frying. There is yet another great tip that really takes the meat to another level, both in terms of flavor and looks; leave the meat bare in the fridge for 1 – 2 days.
But, doesn’t this mean the meat goes bad?
No, it doesn’t. Or well, kind of, if we’re getting technical. What happens is that the contact with oxygen begins a tenderizing process. The surface of the meat goes dark, and a bit dryer. This provides an absolutely superior (dry) surface for frying, try it yourself and see!
How do I sear?
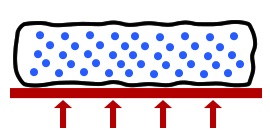
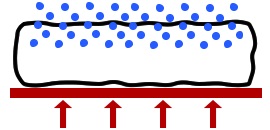
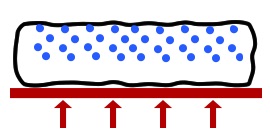
The trick to searing is to flip often. That means no more than 30 seconds per side. The reason for this is we want to retain as much fluid as possible in the meat, so it doesn’t become dry. To understand that, let’s go through what happens when you sear. There is a fixed amount (roughly 70%) of fluid in the meat. When you apply heat on one side, the fluid moves to the top surface. If you leave it on one side for too long, you will “chase” the juice out to the top surface, where it vaporizes. By flipping often, the fluid doesn’t leave the steak and vaporize in the pan. So, be sure to flip often for a better end result.
Creating grill or char marks?
Char marks is very much overrated when it comes to flavor. The reason is that you don’t seal the fluid in the meat as well when you leave it on one side for too long in the frying pan. The best way (according to Heston Blumenthal) is to flip every 15-20 seconds. Jamie Oliver and Gordon Ramsay are doing the same thing. See previous paragraph. By flipping often the juices don’t ‘have time’ to be pushed out to the surface for evaporation. Flipping often gives you a better end result.
Searing school
Reverse sear
This is a technique I really like, for the simple reason that the end result is so much better. So what is reverse searing? Well, it simply means searing last, not first. If you (or your mom) have ever done a roast in the oven, you may know that the standard procedure is to sear it first, to give it a nice brown surface, then place it in the oven to roast until ready. Reverse searing means we give it a good sear as the last step before serving. This is perfect for steaks (like sirloin), as it is kept warm and dry, which is optimal for getting the best sear.
The reason for this is that there is a catch when you fry your steaks in the frying pan or on the grill. What happens when you remove the steak from the heat source? The temperature goes up another 5-10 degrees. When you fry a steak and want it to hit just medium rare or medium, you don’t want to overshoot by 5 degrees. A great suggestion is to instead place the steak in the oven (or over indirect heat on the grill) set to 250° F, using a steak thermometer in the meat. Wait until the inner temperature has reached 110-120° F, take it out and give it a quick sear on both sides in the frying pan. In effect we’re doing the reverse, cooking at low temperature first, and sear last.
What then is the big difference?
Three things differ: you raise the temperature at a much slower rate for one (since the oven temp is low), which leads to more moisture in the meat. Also it won’t “overshoot” that easy when you remove it from the frying pan, since you raised the temperature slowly in the oven, and can sear quicker. And finally; for steaks this helps you get the dry surface that is perfect for searing.
Reverse sear on the grill
When it comes to grilling (or smoking) it is even more important to reverse sear. The reason for this is that warm meat doesn’t absorb smoke nearly as well. This is a good reason to start with meat straight from the fridge, for maximum smoke absorption, and sear last. To summarize: meat only absorbs smoke in the first 1-2 hours. Cold meat absorbs smoke a lot better, so make sure it is cold when you place it on the grill.
Reverse sear, secret trick
The devil is in the details. Here’s a trick you need to know to master the reverse sear. Look at the chart below:
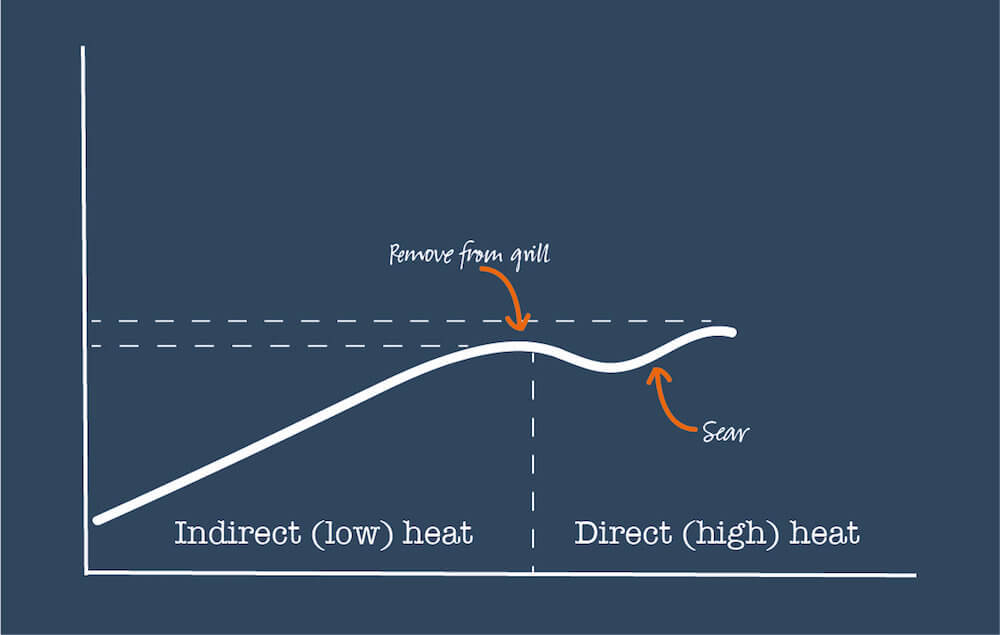
After the meat is almost done, wait for the “dip”. Remove the meat from the grill, keep the temp probe in it, and wait for the temperature to drop below the first threshold before searing. This helps tremendously. Once the temp drops 1-2 degrees below the first target temp, you can begin searing. Not sooner.
Resting the meat
The point of resting the meat is to retain maximum moisture. Read all about carryover heat and how to rest meat here.
How do you apply the 15-20 second rule for flipping when cooking on a grill? Some Meat takes a bit to release before you can flip it.
It does, but it usually doesn’t stick within 15-20 seconds. If it does, just use a spatula and gently separate it from the grill grates and then you can keep flipping.
Dear Hank, I have tried several times to access the ‘chart’ you write about, but is not present on this page. It is stated in your article, “The devil is in the details. Here’s a trick you need to know to master the reverse sear. Look at the chart below:” There is a box where the details might have been, but do not show.
Could you e-mail it to me?
Thank you for all of your wonderful information. Most appreciated.
Mary Bess
Hi Mary Bess! Thanks for highlighting the issue, it turned out to be a caching problem. Regardless, it has now been fixed.
Cheers, Henrik