So, you want to get started with proper barbecue? Fantastic! Here’s an in-depth primer on what you need to know (and get) to get a good start.
1
Get a grill. Yes, that may sound obvious, but this is where you should put some thought into what type of grill you want. The two most common grills are kettle grills, gas grills and ceramic grills (kamados), but there are very many to choose from. Gas grills are very convenient, and you avoid the hassle of lighting charcoal/briquettes, taking care of the ashes afterwards et.c. Charcoal grills are a bit more labor, but feels more authentic to me. Not so much for flavor but for tending a live fire. It all depends on your situation, and what your goals are with grilling.
2
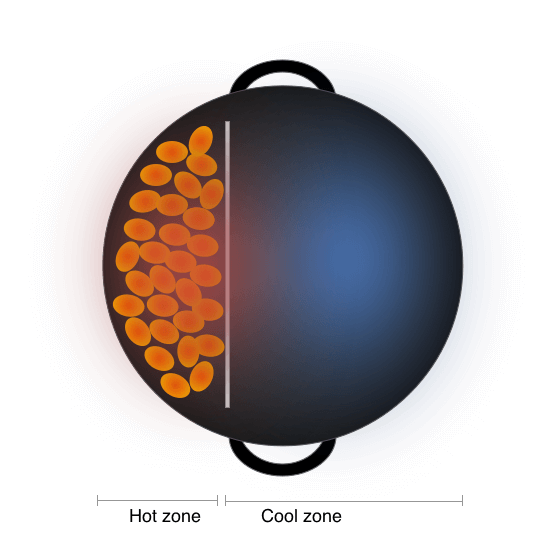
Don’t fire up the grill on full speed. Be smart and learn the difference between direct and indirect heat. You can (and should) create two temperature zones by either using the Slow ‘N Sear or some other divider if you’re using a kettle grill, or only use one of the burners if you’re using a gas grill. It is very tempting to fill your grill with charcoal, set it all on fire and watch in awe of the magic fire you just created, but it pays to hold back here. This allows you to regulate temperature and get many hours of grilling without having to replenish the charcoal.
3
Get a good thermometer. You need one with at least two probes, as you will measure both air temp (inside the grill), as well as food temp. This is key. There’s the FireBoard, Maverick, iGrill, Smoke X and many more. There are two reasons for this:
- The existing lid thermometer (if any) is usually a cheap bi-metal thermometer that isn’t calibrated, and usually differs anywhere from 20-50 degrees from the real temperature.
- Even if it is a high quality calibrated thermometer it isn’t located where the food is at. Temperature differences are large even 4-6 inches ‘away’.
It may not feel intuitive that you can adjust temperature in a grill, but you can indeed, and with great precision too.
4
Master the technique known as Reverse Sear. It applies equally well in the kitchen as well as on the grill, and is especially handy when doing low ‘n slow smoking.
Tools of the trade
One of many good things about grilling is that you don’t need a lot of tools. The basics will get you very far. Here’s a list of must-have things:
- Welding gloves. They block heat very well, and you can get them cheap at Home Depot and other similar stores. Why waste money on expensive brands when ordinary welding gloves are both cheaper and better?
- A plain old steel brush. It’s great for cleaning the grill grates. Avoid the brass brushes, they’re too soft. After every cook I brush my grates with the steel brush in hot water. Then I polish them with steel wool, and into the dishwasher they go. They come out as good as new every time.
- As mentioned before, a good thermometer.
- Plenty of aluminum foil. You will need it for wrapping the food, both for the Texas crutch, as well as for resting meat after cooking it.
- A chimney starter. It is a thin sheet metal cylinder used for pre-heating briquettes. You use it for when only starting a few briquettes, as well as when there’s a need to refill briquettes half-ways through the cook.
What you don’t need
A lot of people are really keen on getting cast iron grill grates. I’m not too fond of them, they’re heavy, rust easily and they’re a mess to clean. If you want proper sear marks you should get Grill Grates™ instead, they are way better at getting the job done.
Next steps
Time to delve even deeper! Below you will find plenty of interesting reading.

